What
Revision control is the process of managing multiple versions of a piece of information. In its simplest form, this is something that many people do by hand: every time you modify a file, save it under a new name that contains a number, each one higher than the number of the preceding version.
Manually managing multiple versions of even a single file is an error-prone task, though, so software tools to help automate this process have long been available. The earliest automated revision control tools were intended to help a single user to manage revisions of a single file. Over the past few decades, the scope of revision control tools has expanded greatly; they now manage multiple files, and help multiple people to work together. The best modern revision control tools have no problem coping with thousands of people working together on projects that consist of hundreds of thousands of files.
Revision control software will track the history and evolution of your project, so you don't have to. For every change, you'll have a log of who made it; why they made it; when they made it; and what the change was.
Revision control software makes it easier for you to collaborate when you're working with other people. For example, when people more or less simultaneously make potentially incompatible changes, the software will help you to identify and resolve those conflicts.
It can help you to recover from mistakes. If you make a change that later turns out to be an error, you can revert to an earlier version of one or more files. In fact, a really good revision control tool will even help you to efficiently figure out exactly when a problem was introduced.
It will help you to work simultaneously on, and manage the drift between, multiple versions of your project. Most of these reasons are equally valid, at least in theory, whether you're working on a project by yourself, or with a hundred other people.
-- [adapted from bryan-mercurial-guide]
RCS: Revision control software are the software tools that automate the process of Revision Control i.e. managing revisions of software artifacts.
Revision: A revision (some seem to use it interchangeably with version while others seem to distinguish the two -- here, let us treat them as the same, for simplicity) is a state of a piece of information at a specific time that is a result of some changes to it e.g., if you modify the code and save the file, you have a new revision (or a version) of that file.
Revision control software are also known as Version Control Software (VCS), and by a few other names.
Repositories
Repository (repo for short): The database of the history of a directory being tracked by an RCS software (e.g. Git).
The repository is the database where the meta-data about the revision history are stored. Suppose you want to apply revision control on files in a directory called ProjectFoo. In that case, you need to set up a repo (short for repository) in the ProjectFoo directory, which is referred to as the working directory of the repo. For example, Git uses a hidden folder named .git inside the working directory.
You can have multiple repos in your computer, each repo revision-controlling files of a different working directory, for examples, files of different projects.
Saving History
Tracking and ignoring
In a repo, you can specify which files to track and which files to ignore. Some files such as temporary log files created during the build/test process should not be revision-controlled.
Staging and committing
Committing saves a snapshot of the current state of the tracked files in the revision control history. Such a snapshot is also called a commit (i.e. the noun).
When ready to commit, you first stage the specific changes you want to commit. This intermediate step allows you to commit only some changes while saving other changes for a later commit.
Using History
RCS tools store the history of the working directory as a series of commits. This means you should commit after each change that you want the RCS to 'remember'.
Each commit in a repo is a recorded point in the history of the project that is uniquely identified by an auto-generated hash e.g. a16043703f28e5b3dab95915f5c5e5bf4fdc5fc1.
You can tag a specific commit with a more easily identifiable name e.g. v1.0.2.
To see what changed between two points of the history, you can ask the RCS tool to diff the two commits in concern.
To restore the state of the working directory at a point in the past, you can checkout the commit in concern. i.e., you can traverse the history of the working directory simply by checking out the commits you are interested in.
RCS: Revision control software are the software tools that automate the process of Revision Control i.e. managing revisions of software artifacts.
Remote Repositories
Remote repositories are repos that are hosted on remote computers and allow remote access. They are especially useful for sharing the revision history of a codebase among team members of a multi-person project. They can also serve as a remote backup of your codebase.
It is possible to set up your own remote repo on a server, but the easier option is to use a remote repo hosting service such as GitHub or BitBucket.
You can clone a repo to create a copy of that repo in another location on your computer. The copy will even have the revision history of the original repo i.e., identical to the original repo. For example, you can clone a remote repo onto your computer to create a local copy of the remote repo.
When you clone from a repo, the original repo is commonly referred to as the upstream repo. A repo can have multiple upstream repos. For example, let's say a repo repo1 was cloned as repo2 which was then cloned as repo3. In this case, repo1 and repo2 are upstream repos of repo3.
You can pull from one repo to another, to receive new commits in the second repo, if the repos have a shared history. Let's say some new commits were added to the upstream repo is a term used to refer to the repo you cloned fromupstream repo after you cloned it and you would like to copy over those new commits to your own clone i.e., sync your clone with the upstream repo. In that case, you pull from the upstream repo to your clone.
You can push new commits in one repo to another repo which will copy the new commits onto the destination repo. Note that pushing to a repo requires you to have write-access to it. Furthermore, you can push between repos only if those repos have a shared history among them (i.e., one was created by copying the other at some point in the past).
Cloning, pushing, and pulling can be done between two local repos too, although it is more common for them to involve a remote repo.
A repo can work with any number of other repositories as long as they have a shared history e.g., repo1 can pull from (or push to) repo2 and repo3 if they have a shared history between them.
A fork is a remote copy of a remote repo. As you know, cloning creates a local copy of a repo. In contrast, forking creates a remote copy of a Git repo hosted on GitHub. This is particularly useful if you want to play around with a GitHub repo but you don't have write permissions to it; you can simply fork the repo and do whatever you want with the fork as you are the owner of the fork.
A pull request (PR for short) is a mechanism for contributing code to a remote repo, i.e., "I'm requesting you to pull my proposed changes to your repo". For this to work, the two repos must have a shared history. The most common case is sending PRs from a fork to its upstream repo is a repo you forked fromupstream repo.
Here is a scenario that includes all the concepts introduced above (click inside the slide to advance the animation):
Branching
Branching is the process of evolving multiple versions of the software in parallel. For example, one team member can create a new branch and add an experimental feature to it while the rest of the team keeps working on another branch. Branches can be given names e.g. master, release, dev.
A branch can be merged into another branch. Merging usually results in a new commit that represents the changes done in the branch being merged.
 Branching and merging
 Merge conflicts happen when you try to merge two branches that had changed the same part of the code and the RCS cannot decide which changes to keep. In those cases, you have to ‘resolve’ the conflicts manually.
DRCS vs CRCS
RCS can be done in two ways: the centralized way and the distributed way.
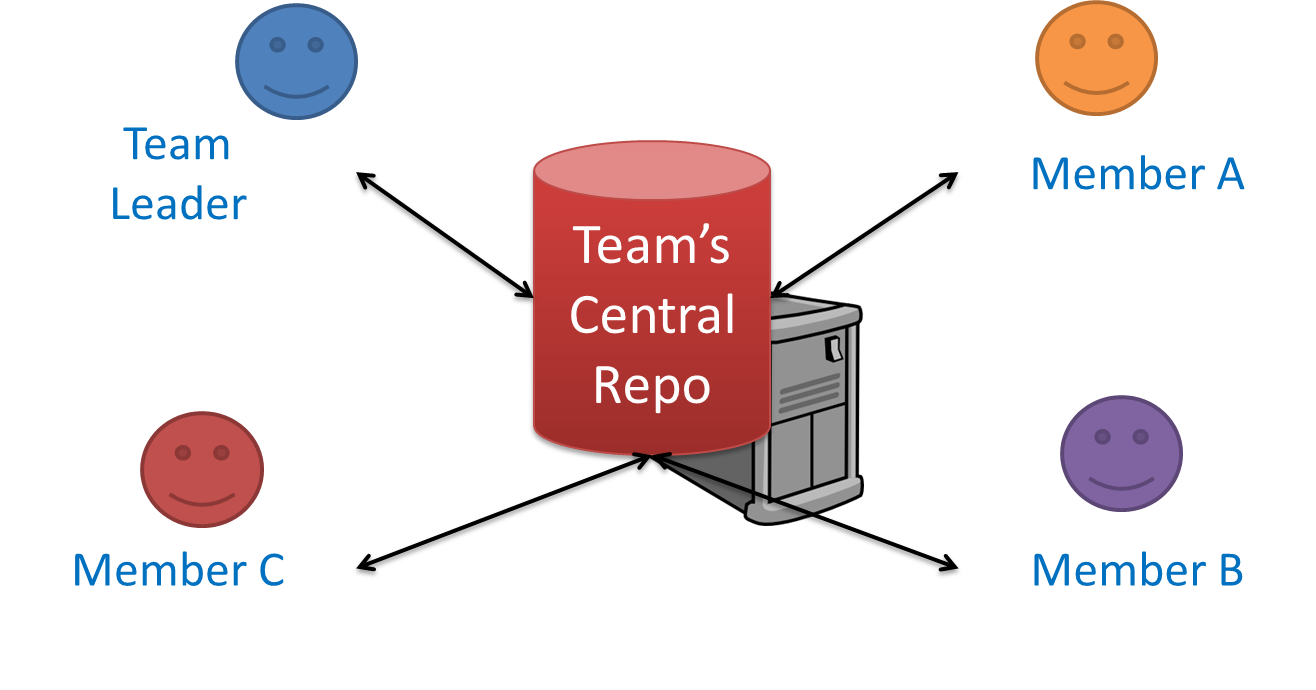
Centralized RCS (CRCS for short) uses a central remote repo that is shared by the team. Team members download (‘pull’) and upload (‘push’) changes between their own local repositories and the central repository. Older RCS tools such as CVS and SVN support only this model. Note that these older RCS do not support the notion of a local repo either. Instead, they force users to do all the versioning with the remote repo.

The centralized RCS approach without any local repos (e.g., CVS, SVN)
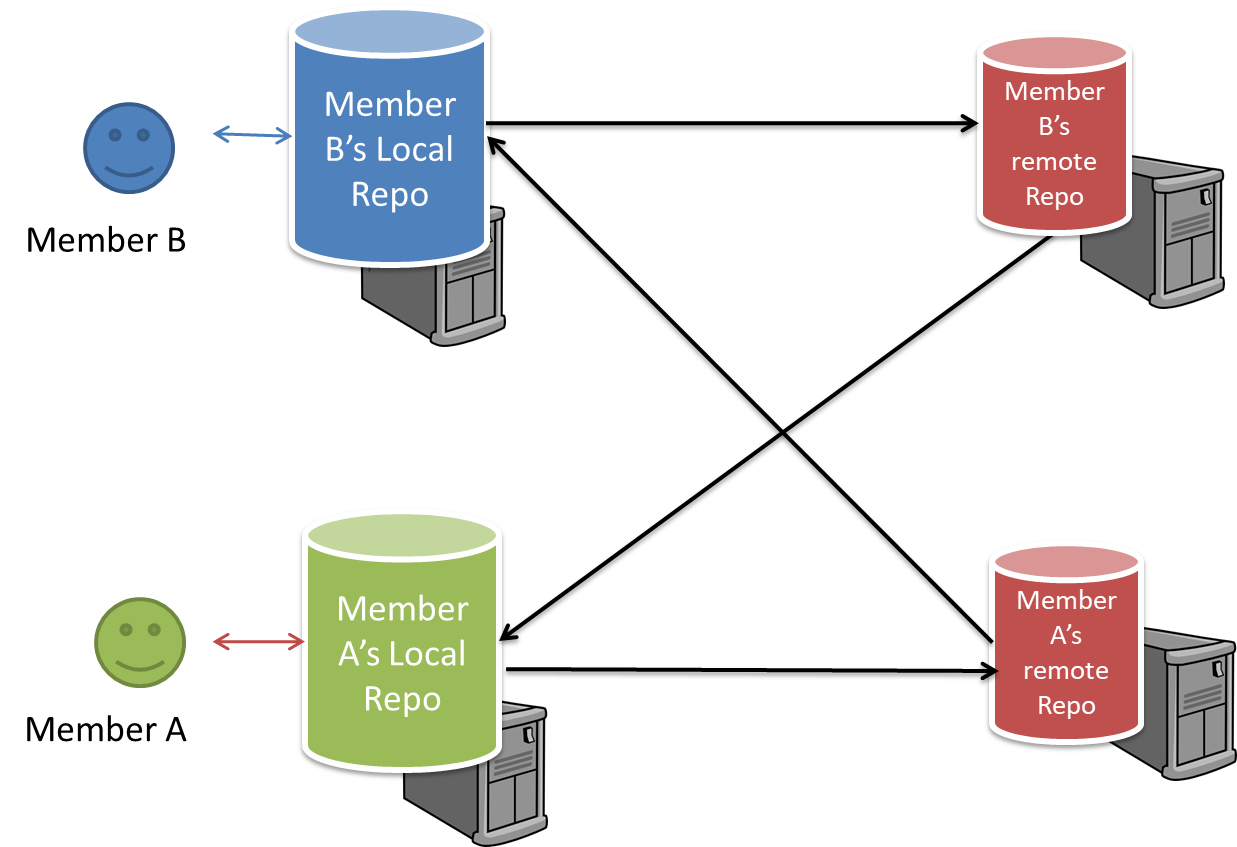
Distributed RCS (DRCS for short, also known as Decentralized RCS) allows multiple remote repos and pulling and pushing can be done among them in arbitrary ways. The workflow can vary differently from team to team. For example, every team member can have his/her own remote repository in addition to their own local repository, as shown in the diagram below. Git and Mercurial are some prominent RCS tools that support the distributed approach.

The decentralized RCS approach
Forking Flow

In the forking workflow, the 'official' version of the software is kept in a remote repo designated as the 'main repo'. All team members fork the main repo and create pull requests from their fork to the main repo.
To illustrate how the workflow goes, let’s assume Jean wants to fix a bug in the code. Here are the steps:
- Jean creates a separate branch in her local repo and fixes the bug in that branch.
Common mistake: Doing the proposed changes in themasterbranch -- if Jean does that, she will not be able to have more than one PR open at any time because any changes to themasterbranch will be reflected in all open PRs. - Jean pushes the branch to her fork.
- Jean creates a pull request from that branch in her fork to the main repo.
- Other members review Jean’s pull request.
- If reviewers suggested any changes, Jean updates the PR accordingly.
- When reviewers are satisfied with the PR, one of the members (usually the team lead or a designated 'maintainer' of the main repo) merges the PR, which brings Jean’s code to the main repo.
- Other members, realizing there is new code in the upstream repo, sync their forks with the new upstream repo (i.e. the main repo). This is done by pulling the new code to their own local repo and pushing the updated code to their own fork.
Possible mistake: Creating another 'reverse' PR from the team repo to the team member's fork to sync the member's fork with the merged code. PRs are meant to go from downstream repos to upstream repos, not in the other direction.
One main benefit of this workflow is that it does not require most contributors to have write permissions to the main repository. Only those who are merging PRs need write permissions. The main drawback of this workflow is the extra overhead of sending everything through forks.